Windows 11, the newest version of the Microsoft operating system, comes with many exciting features, making it a big improvement from Windows 10. But, some users are dealing with a problem of high RAM or memory usage. This issue happens because of different reasons, making Windows 11 not work as well as it could on laptops and PCs.
If you’re one of those facing this problem and want to boost your computer’s performance or increase your laptop’s RAM, you’re in the right spot. You can go through these effective solutions to reduce memory usage in Windows 11. You can also look at what is Memory Usage on Windows and how to check Memory Usage on Windows 11. Just follow the whole article to make your PC work better without hassle.
What Is Memory Usage on Windows?
Memory usage on Windows is the amount of random access memory (RAM) that is currently being used by the operating system, applications, and other processes. RAM is a type of volatile memory that is used to store data that is being actively used by the computer. When the computer is turned off, all of the data in the RAM is lost.
However, upon restarting or booting up the system, background services, operating system functions, and actively running applications begin to utilize the available RAM.
If the memory usage percentage is excessively high, it can lead to performance issues such as slow responsiveness, lags, or even system freezes.
Therefore, balancing and managing memory usage in Windows is fundamental for ensuring an efficient and smooth computing experience. Regularly monitoring memory usage can help you prevent performance degradation.
How to Check Memory Usage on Windows 11
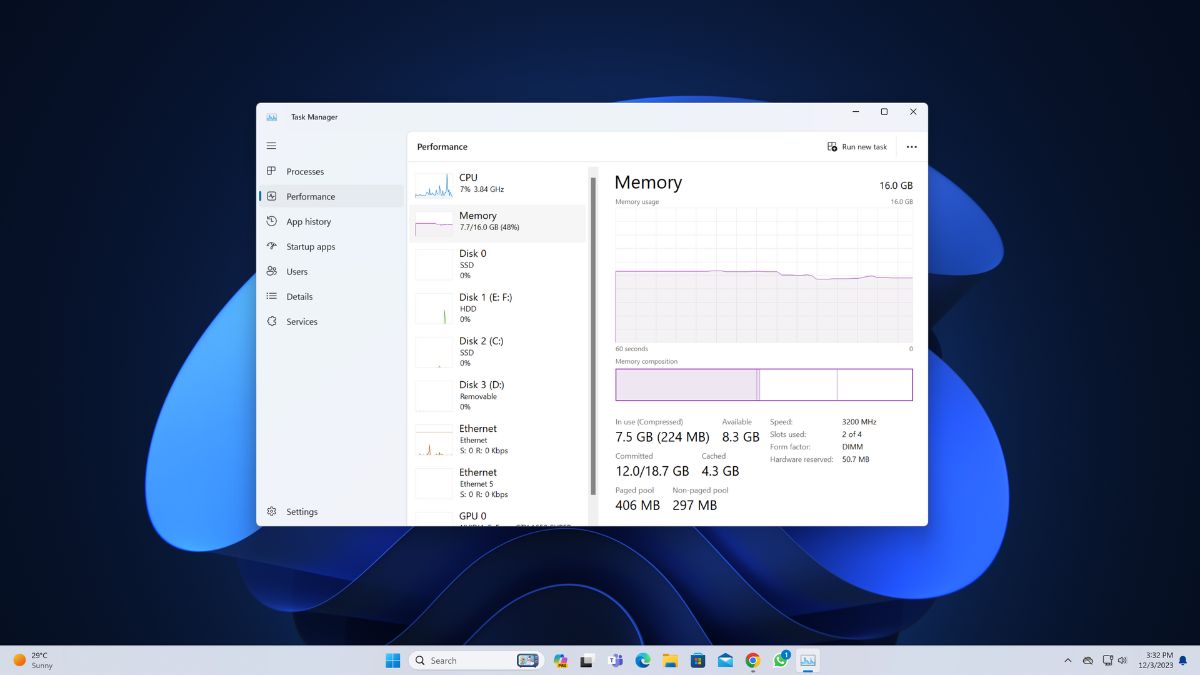
There are a few different ways to check memory usage on Windows. One way is to use Task Manager. To open Task Manager, press Ctrl + Shift + Esc. In Task Manager, click the Performance tab. Under Memory, you can see how much RAM is currently being used and how much RAM is free.
Another way to check memory usage is to use Resource Monitor. To open Resource Monitor, press Windows + R to open the Run dialog box. Type resmon and press Enter. In Resource Monitor, click the Memory tab. You can see a more detailed view of memory usage on this tab, including which processes are using the most RAM.
How to Fix High RAM Usage in Windows 11
High RAM usage can be a common problem in Windows 11, especially if you have a lot of programs running at the same time. If you’re experiencing high RAM usage, it can cause your computer to slow down and become unresponsive.
There are a few things you can do to fix high RAM usage in Windows 11, and we’ll discuss some of the most common solutions in this article.
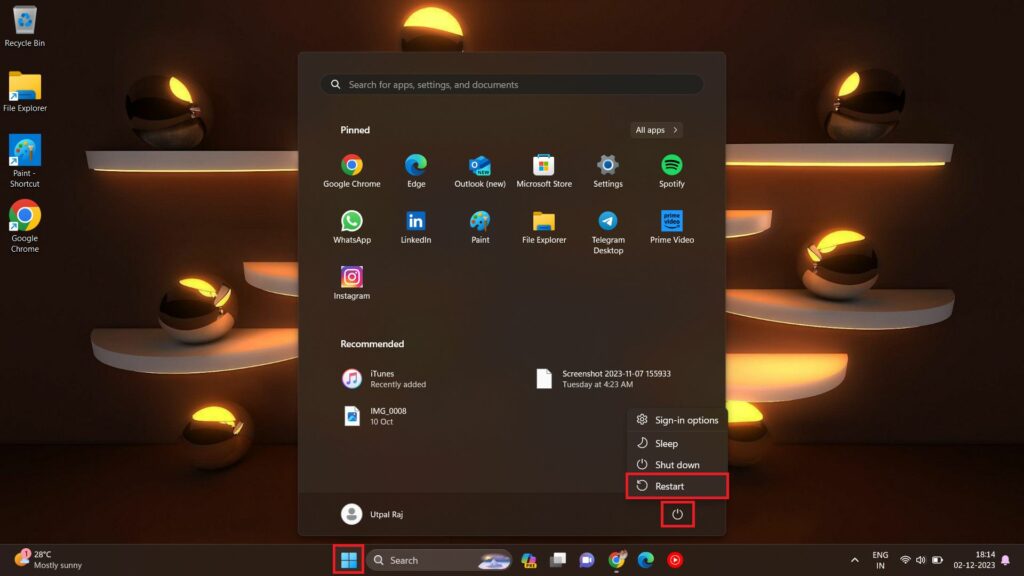
1. Restart PC
One of the easiest and most effective ways to resolve excessive RAM usage in Windows 11 is to simply restart the computer. It can address various issues and reduce excessive RAM consumption. When you restart your computer, it shuts down all currently active programs and background processes. This effectively refreshes your system, stopping any tasks that use a lot of memory and are causing the computer to use too much RAM.
As your PC restarts, it releases the memory that was previously allocated to various applications. This action can help free up valuable RAM and ensure a more seamless experience. Follow the below steps to do so.
1. Click the Start Menu.
2. Click on the Power icon, and then select Restart.
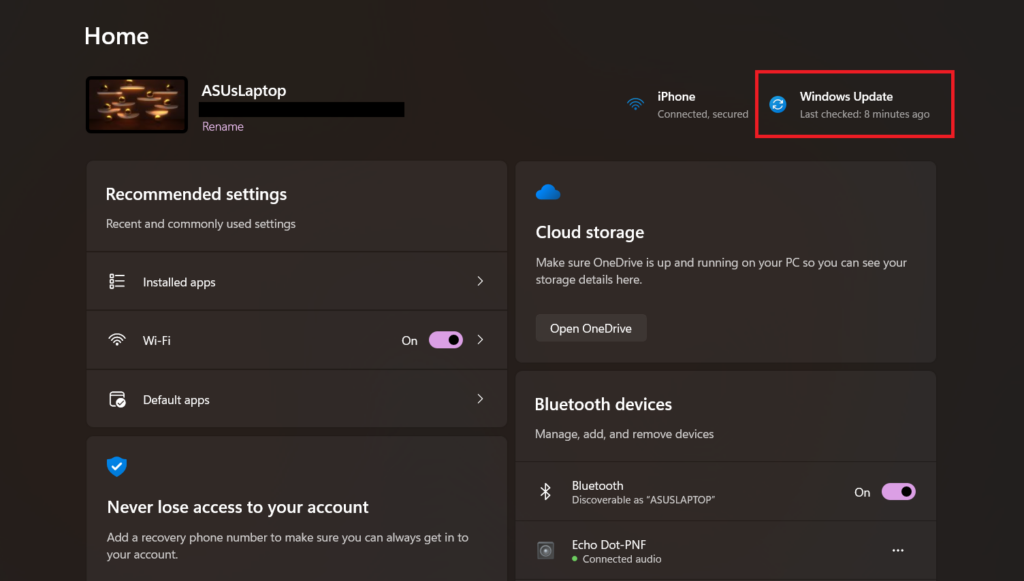
2. Update Windows 11
Restarting your computer might have helped you, but if you still notice that your PC is using high RAM, making sure your operating system is up to date can make a big difference. Regular system updates not only make your computer run better but also can solve problems related to RAM. Windows 11 updates include bug fixes and optimizations for better resource management. These updates can resolve software issues that contribute to high RAM usage.
Keeping your operating system updated is also essential for security reasons. This helps keep your system safe from potential problems that can slow it down. Follow the steps below to check for Windows 11 updates.
1. Press the Windows + I button simultaneously to open Settings.
2. In the Settings window, select Windows Update.
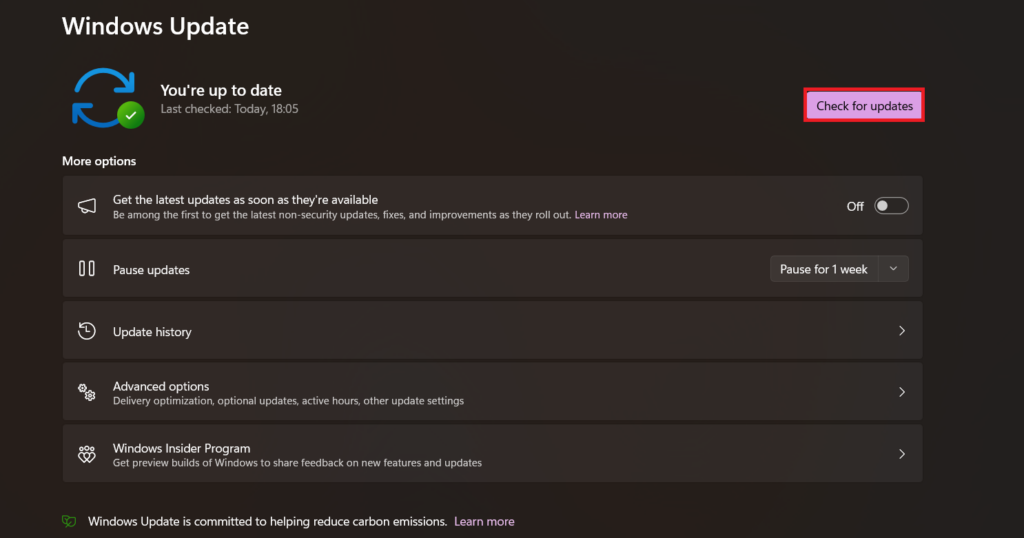
3. Click Check for updates and follow the on-screen instructions to download and install any available updates.
3. Uninstall Unused Apps
You might be facing a shortage of RAM in your Windows 11 for various reasons, and one of the primary reasons is the accumulation of numerous unnecessary apps over time. Even if you rarely use these applications or don’t use them at all, they continue to occupy a significant portion of your computer’s RAM.
Many of these apps are configured to automatically launch every time, which is unnecessary if you rarely use them. This continuous auto-start contributes to the excessive consumption of RAM. That’s why uninstalling these unused apps is crucial to free up storage space and improve your PC’s RAM situation.
Here’s how you can uninstall apps on Windows 11:
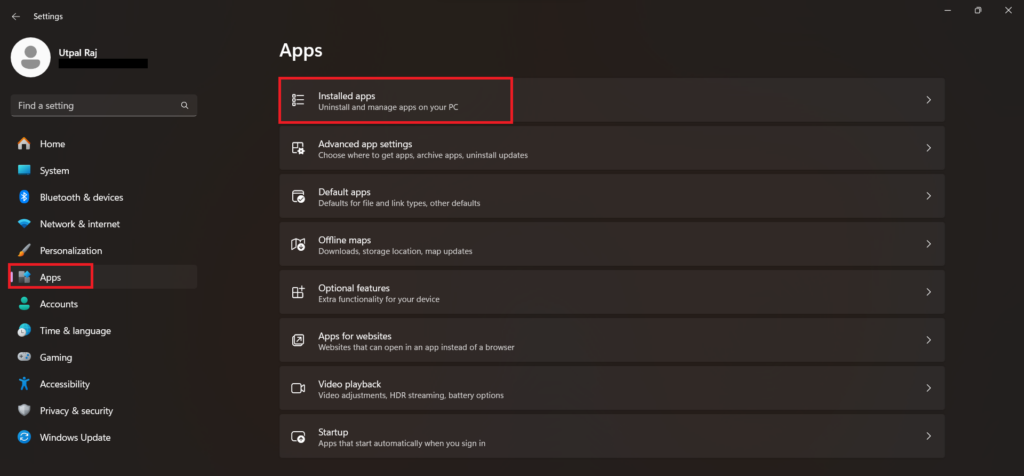
1. Open Settings.
2. Navigate to the Apps section on the left-hand panel.
3. Select Installed Apps from the options available on the right-hand panel.
4. Upon clicking Installed Apps, all the applications on your PC will appear in the window. Here, locate the applications that you wanna uninstall.
5. Then, click the three-dot icon and select Uninstall from the menu popup.
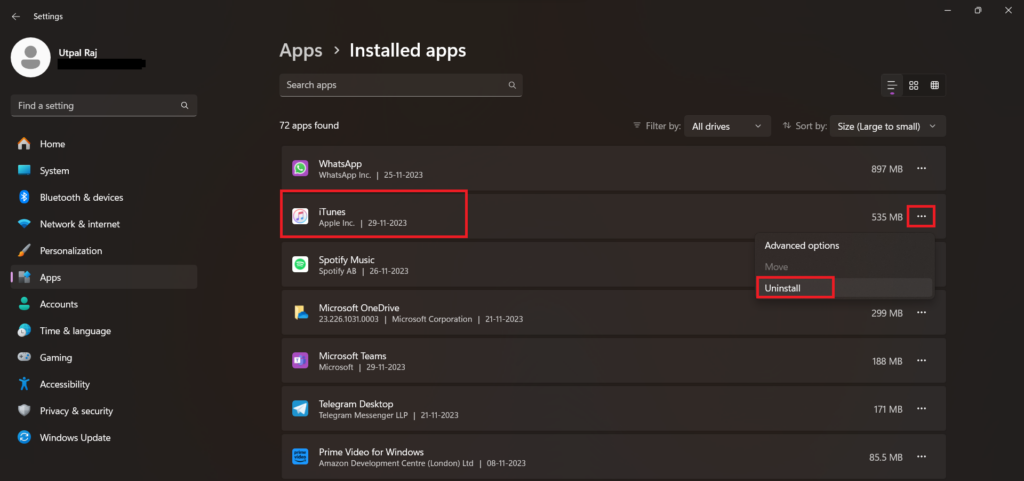
6. A confirmation dialog will appear. Click Uninstall again to proceed with the uninstallation.

4. Close Unnecessary Apps and Services
If you’ve tried the previously mentioned methods to fix high RAM usage in Windows 11 and still face the same issues, it may be because of unnecessary apps and services running in the background.
When you open numerous apps and services that you don’t frequently use, they continue running in the background, consuming your PC’s storage and, importantly, RAM. This can be a significant drain on your system’s resources. However, you can regain control and free up precious RAM by ending these unnecessary apps and services using the built-in Windows Task Manager.
Here’s how you can close unnecessary apps and services using the Task Manager:
1. Press Ctrl + Shift + Esc on your keyboard simultaneously to open Task Manager.
2. In the Task Manager window, click on the Processes tab, and then click on the Memory column to sort the processes by memory usage, with the highest consumers listed first.
3. Now, look for apps and services you don’t need at the moment or are using excessive RAM. Common examples might include background applications related to software updates, unnecessary browser tabs, or applications you’ve opened but aren’t actively using.
4. Right-click on the unnecessary apps and services.
5. Then, click the End Task option from the pop-up menu.

5. Run Windows Memory Diagnostic
Is your Windows 11 computer experiencing issues like slow performance, freezing issues, hanging, blue screen errors, or unexpected reboots? These problems can sometimes be attributed to memory issues, particularly with your computer’s Random Access Memory (RAM).
To identify and diagnose such problems, Windows 11 provides a built-in tool called the Windows Memory Diagnostic Tool. It is a valuable tool that can help you identify and address potential memory problems on your PC.
Here are the steps to run the Windows Memory Diagnostic Tool:
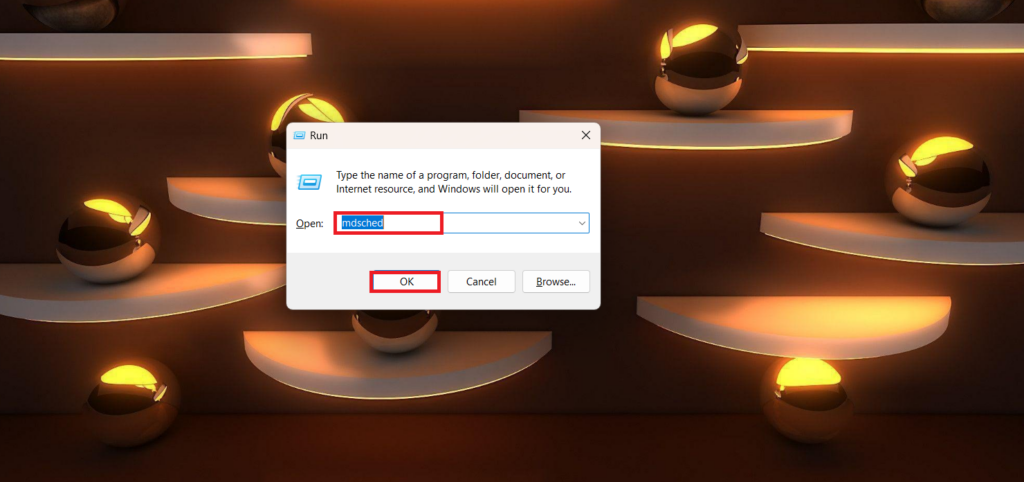
1. Press the Windows key + R to open the Run dialog box.
2. Type mdsched in the search field, and hit OK.
3. A window pop-up will appear with two distinct options.
4. Here, click on Restart now and check for problems option to run the memory diagnostic.
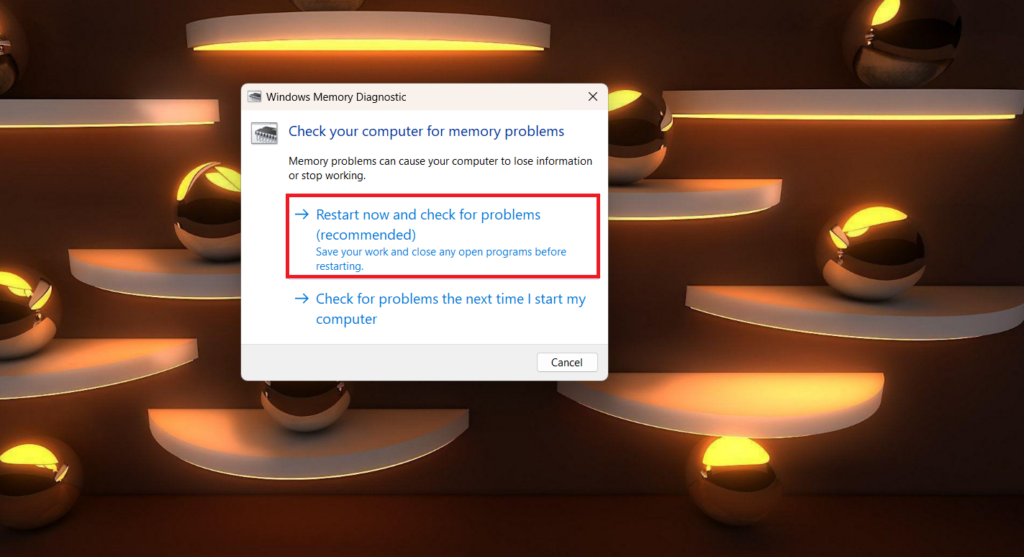
Your computer will restart, and the Windows Memory Diagnostic Tool will begin running. The test will take several minutes to complete as it performs two different tests, so please be patient.
Once the test is complete, your computer will restart, and you will see a notification with the test results. You can also view the results in Event Viewer. To learn more, you can check out our guide on how to use the Windows Memory Diagnostic Tool.
Note
If the test detects any errors, you will need to contact your computer manufacturer or a qualified technician to replace the faulty RAM module.
6. Disable Startup Apps
You can boost your Windows 11 computer’s performance and free up RAM by taking control of unnecessary startup apps. These are the applications that automatically launch when you restart your computer. While some apps are essential for your workflow, many of them are superfluous and can be easily disabled.
You can even customize your list of startup apps to include the ones you frequently use. This way, you can have your preferred apps ready to go as soon as your computer boots up.
Let’s explore how to manage these startup apps and ensure your system runs efficiently.
1. Open the Windows Settings app.
2. Click on Apps in the left sidebar and click on Startup in the right pane.

3. Toggle off the switch next to the apps you don’t want to start at startup.
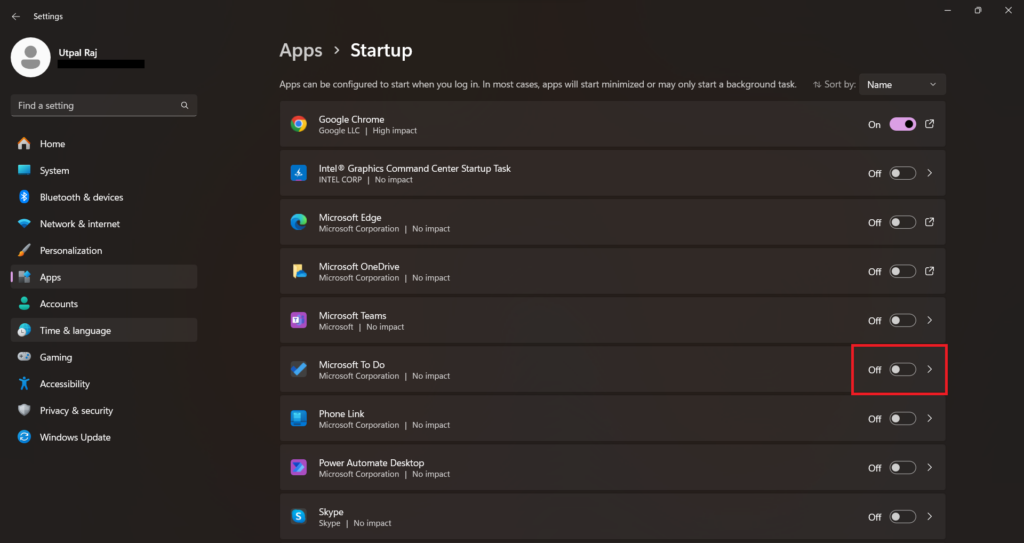
Using the above steps, you can control the Startup apps and reduce RAM usage on your Windows 11 system.
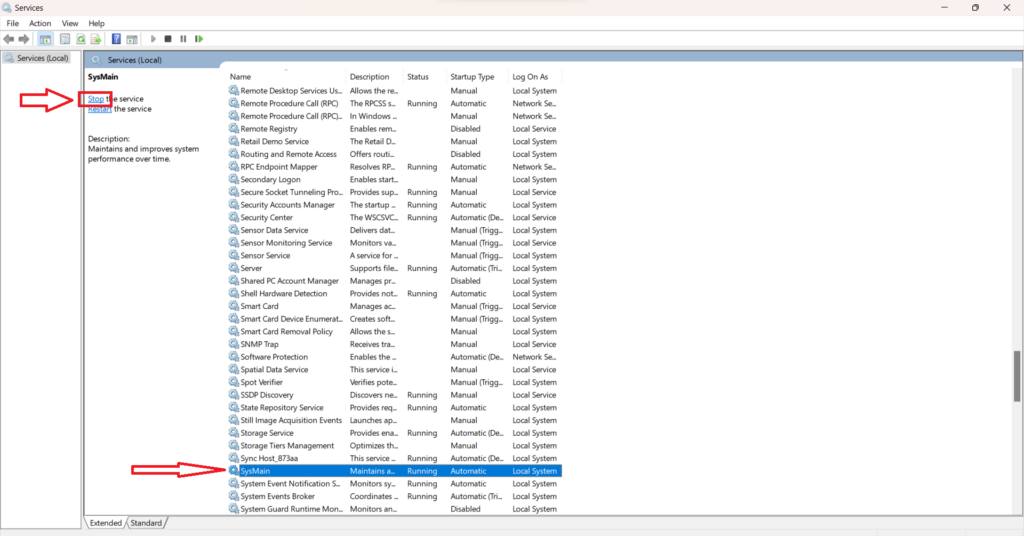
7. Disable SysMain Service
The SysMain service, known as Superfetch, is a Windows service that monitors how you use your computer and preloads frequently used applications and data into memory. This can improve the startup and load times of your applications.
However, the SysMain service can also use a significant amount of CPU and disk resources, especially when it is first running. If you are experiencing performance problems with your computer, you may want to consider disabling the SysMain service.
Here’s how you can disable the SysMain service:
1. Press the Windows key + R to open Run.
2. Here, type services.msc and press Enter.
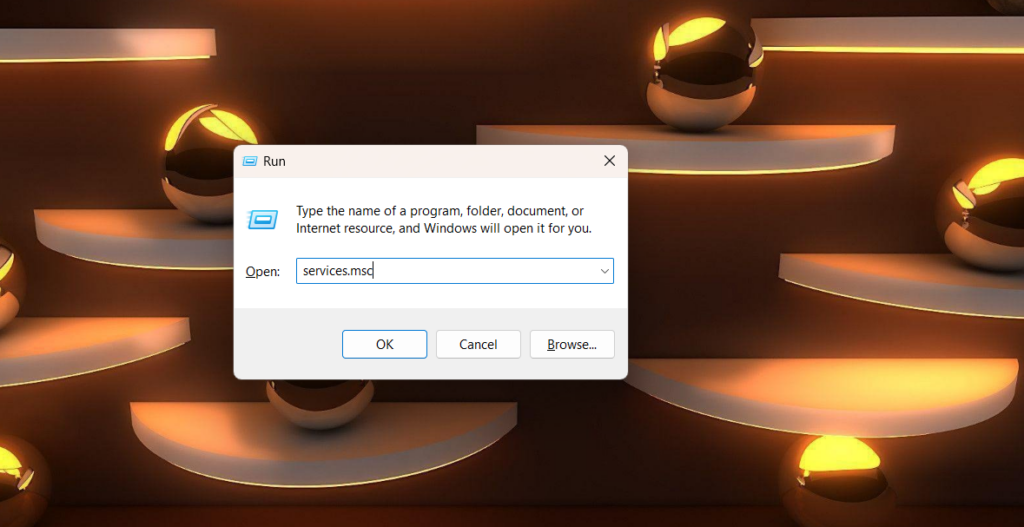
3. Scroll down and double-click on the SysMain from the lists of services.
4. Then, click the Stop button to stop the service.
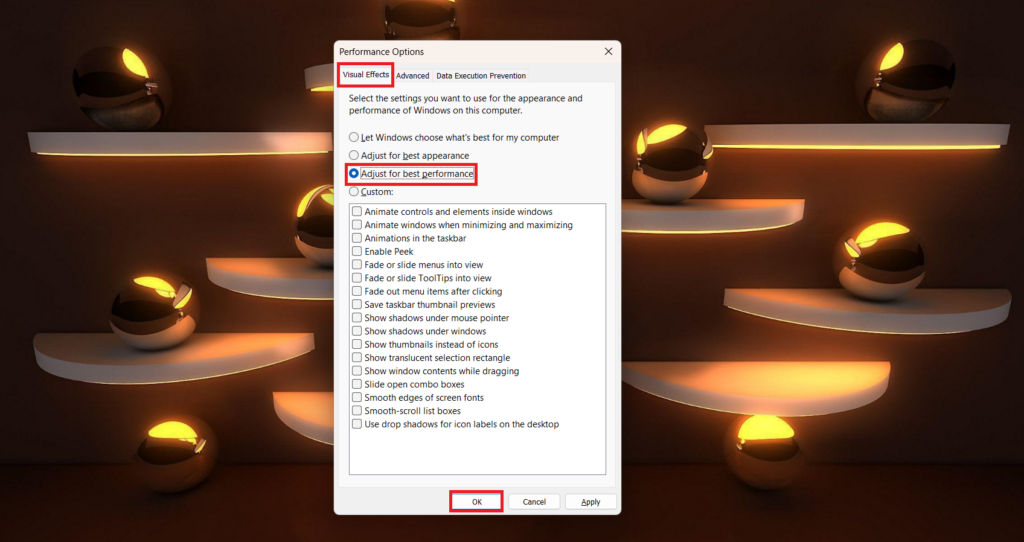
8. Adjust for Best Performance
Adjusting the best performance will disable some of the visual effects in Windows 11 and it may help to smoothly run the PC. For example, you may notice that windows no longer fade in and out when you open and close them. You may also notice that fonts are not as smooth as they were before. But it will also help to improve performance on older or less powerful computers.
Follow the steps below to adjust for the best performance in Windows 11
1. Open the Start menu and search for Performance.
2. Click on Adjust the appearance and performance of Windows option.
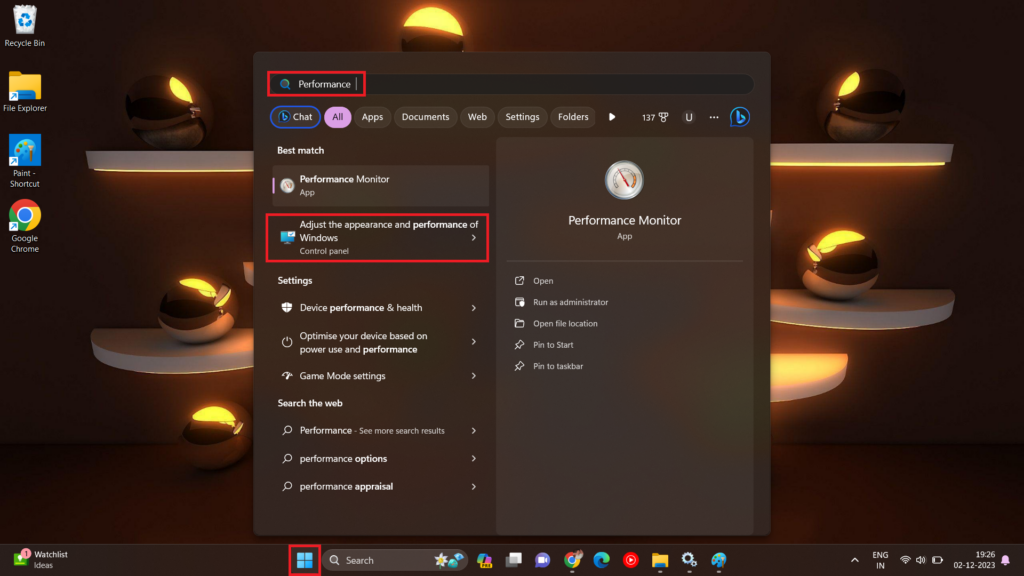
3. Click on the Visual Effects tab and select Adjust for best performance.
4. Now, to apply and save the changes, click on the Apply and OK button.
5. After that, Restart your PC.
9. Change Registry Key
The Windows Registry is a powerful tool that can be used to optimize your system’s performance. Changing the registry key is also an important method to fix high RAM usage in Windows 11. It is important to note that changing registry keys can be dangerous, follow the steps very precisely and only change keys that you are familiar with. Do not change what a key does if you are unsure.
1. Press Windows key + R to open Run.
2. Here, type regedit and press Enter to open the Registry Editor.
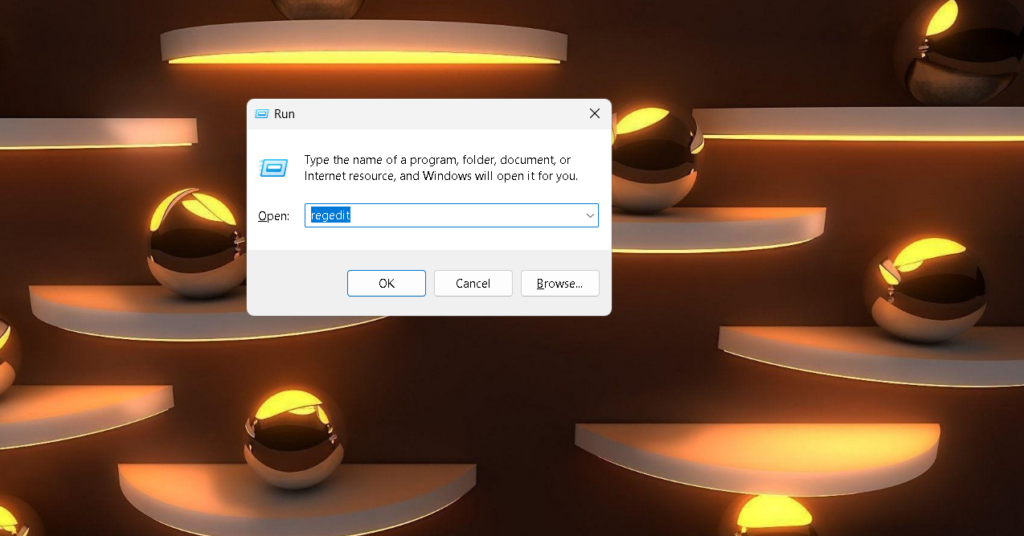
3. A confirmation pop-up will appear saying Do you want to allow this app to make changes to your device. Press Yes if you want.
4. Navigate the HKEY_LOCAL_MACHINE registry key and expand SYSTEM > CurrentControlSet > Control.
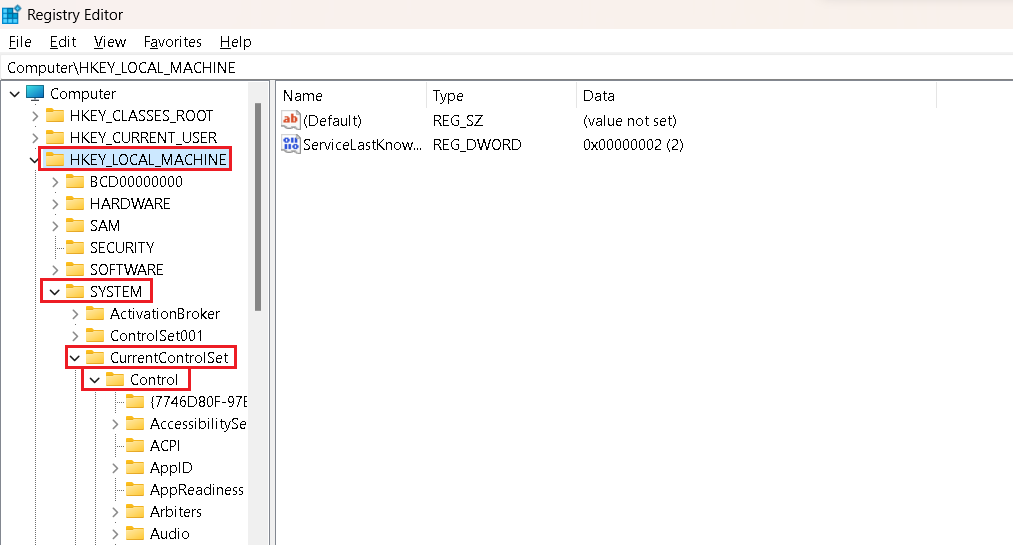
5. Furthermore, expand Session Manager > Memory Management.
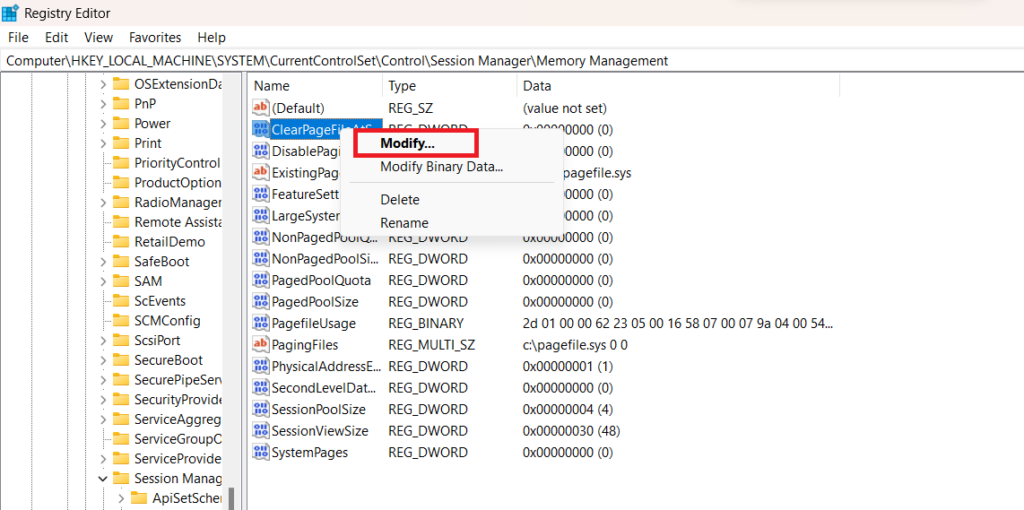
6. In the right-hand pane, double-click the ClearPageFileAtShutdown registry key.
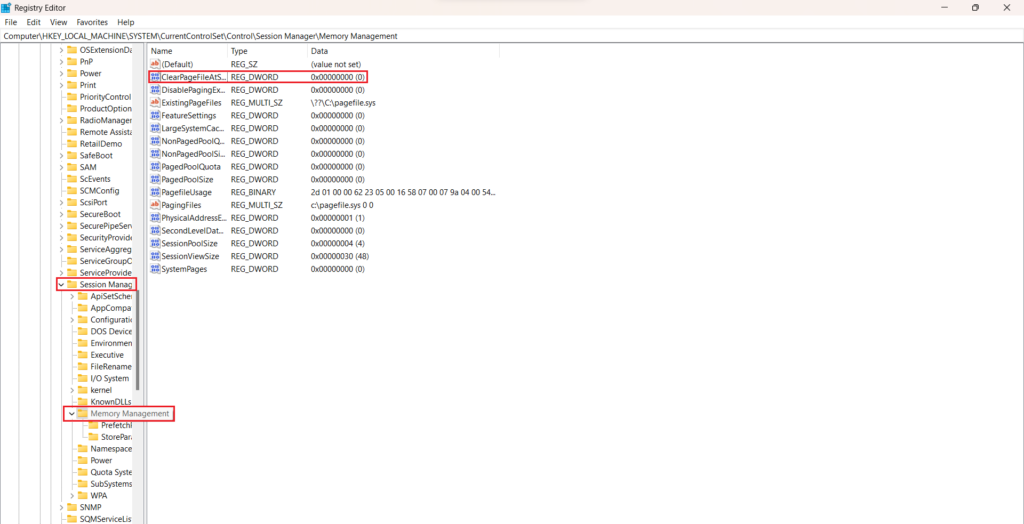
7. Click on Modify from the menu that appears.
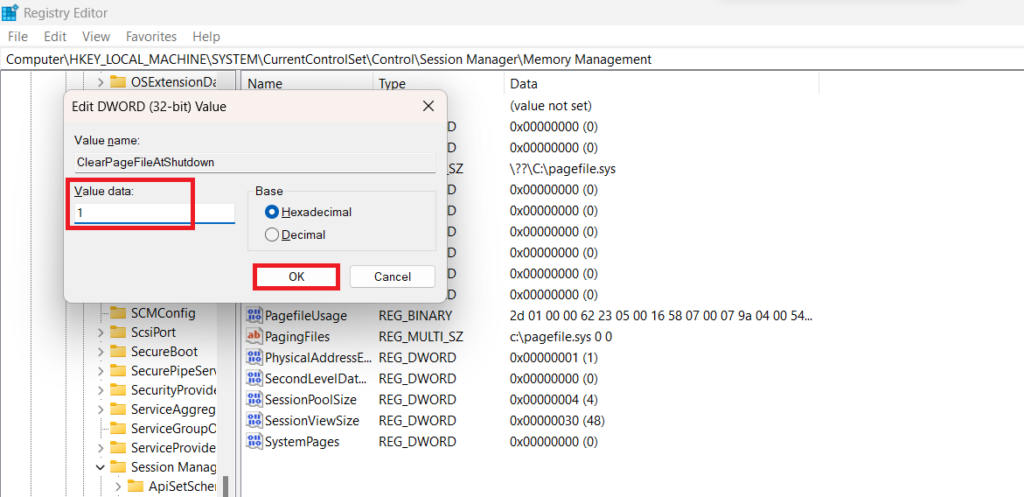
8. Change the value data to 1 and select base as Hexadecimal.
9. Then, click OK to save the change.
10. After that, close the Registry Editor and restart your computer.
10. Check for Virus
If you continue to experience the same issue, there’s a significant possibility that your PC has viruses, which can result in high usage of memory or RAM. To address this, you should promptly scan and remove any viruses from your computer.
Here are some steps you can follow to eliminate these threats from your system. To check for viruses in Windows 11, you can use Windows Security, which is Microsoft’s built-in antivirus software, or download and install Malwarebytes.
Let me show you how you can check for viruses using Windows Security:
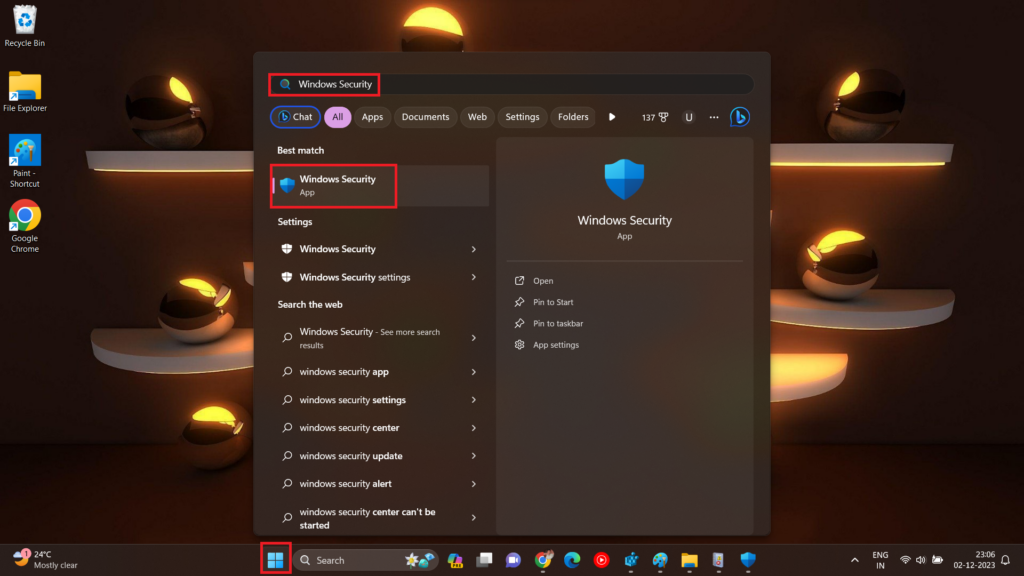
1. Click on the Start button.
2. It will open the Start menu, type Windows Security, and open it.
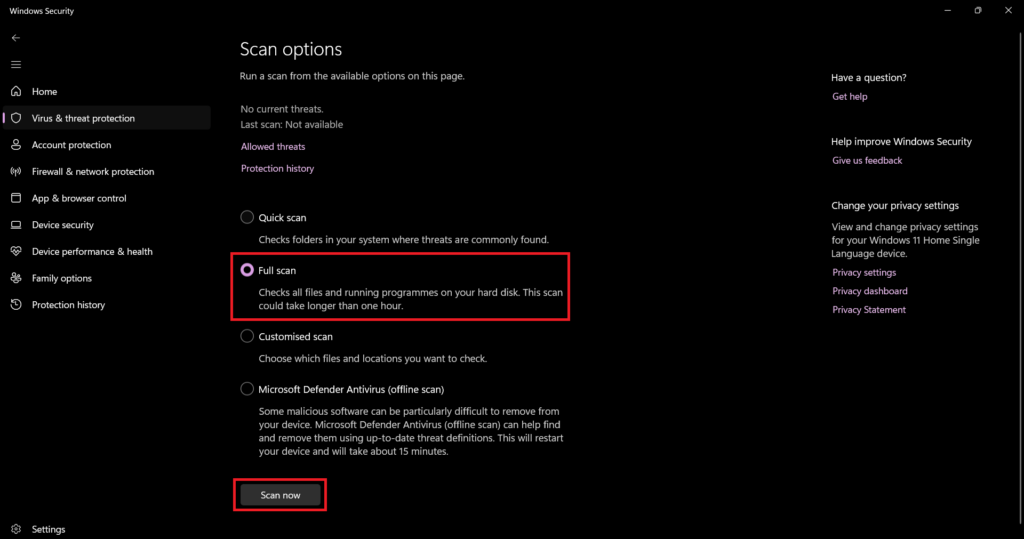
3. Click on the Virus & threat protection tab and then click on the Quick Scan button. However, if you want to perform a full scan, click on Scan options.
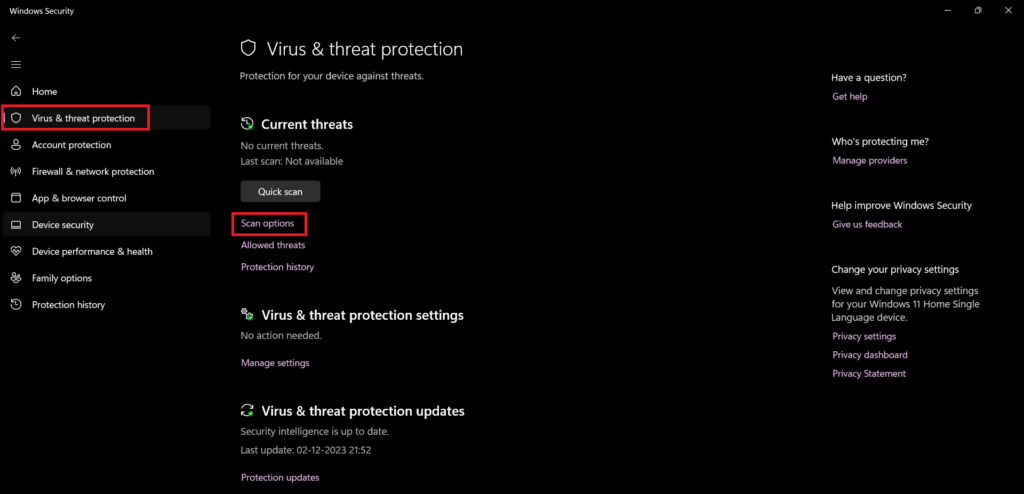
4. Here, select Full Scan and click on the Scan Now button.
Windows Security will scan your computer for viruses and other malware. If any threats are found, Windows Security will prompt you to remove them.
11. Upgrade or Install Additional RAM
After following all the above methods, if you are still facing high RAM usage on Windows 11, you might need to upgrade or install additional RAM modules on your system. As the installed RAM modules may not be sufficient enough to handle processes on your system.
However, adding physical RAM requires purchasing compatible modules and installing them on your laptop or PC. After upgrading or installing RAM modules, you should see an effective boost and improvement in performance to a certain extent fixing high RAM usage.
Conclusion
The suggested methods for fixing RAM usage in Windows 11 would have helped you overcome the situation. These methods range from basic restarts to system updates and adjusting preferences to manage RAM usage. If any of the fixes did not work, you could have also considered upgrading or installing additional RAM in your Windows 11 system.
Before trying any fixes, it would have been essential to read about how to check memory usage in Windows 11, which would have helped you identify the situation of your RAM and the reasons behind its high usage. However, if you are facing high CPU usage, you can check out our guide on how to fix high CPU usage on Windows 11.