Have you ever encountered a situation where your computer is becoming slow, perhaps after installing some high-end applications or games? If you find yourself in this scenario, chances are your computer’s RAM is full, and it’s running on virtual memory to compensate. Now, you will need to increase virtual memory in Windows 11.
Virtual memory is a concept that often confuses many Windows 11 users. In simple terms, it is like an extra storage space that your computer uses when it runs out of memory (RAM) or you’re having high RAM usage. But, no worries, stay tuned with this guide to understand the concept of virtual memory, and how to increase virtual memory in the Windows 11 system. Also, have a look at the basics of virtual memory, and why increasing virtual memory can be beneficial.
What is Virtual Memory?
Understanding virtual memory in Windows 11 is like knowing a secret trick to make your computer work better. Virtual memory is like a helpful assistant for your computer. Think of it this way: virtual memory steps in when your computer works too hard and fills up its memory (RAM). It borrows a bit of space from the storage (SSD) to give your computer some breathing room.
Virtual memory keeps your computer running smoothly by moving some stuff from fast memory (RAM) to storage (SSD) for a little while. This helps your active programs keep going without any hiccups. It’s like a backup plan for when your computer is juggling too much. But, if your computer relies too much on virtual memory, it might slow down a bit.
Why You Should Increase Virtual Memory?
Before going into the process of enhancing the virtual memory of your Windows 11, understand why you should increase Virtual Memory.
1. When the RAM of your computer is running low, the operating system can start to swap or transfer data to virtual memory, which can help prevent the system from crashing or freezing. Increasing virtual memory can provide more buffer space for this swapping process, potentially improving overall system performance.
2. Some applications, such as video editing software or high-end games, require significant amounts of RAM. Increasing virtual memory can allow these applications to run more smoothly, especially if you have limited physical RAM.
3. If you frequently switch between multiple applications, increasing virtual memory can help prevent slowdowns or crashes. This is because more memory can be allocated to each active application.
If you’re facing a similar situation, increasing virtual memory is advisable. Keep in mind, that increasing virtual memory is a temporary solution, and if you are looking for a permanent solution try considering anything else – like installing additional physical RAM modules to your system.
How to Increase Virtual Memory on Windows 11
Now that you know the key points for increasing virtual memory in Windows 11, let’s go through the steps. Adding virtual memory is a bit tricky and involves some calculations, so take your time and follow the steps carefully. Additionally, consider checking your system’s available space before going through the steps.
Here are the steps you can follow to increase Virtual Memory:
1. Press Windows + I to open the Settings.
2. In the right side panel, click on the System.
3. Then, scroll down and click on the About option.
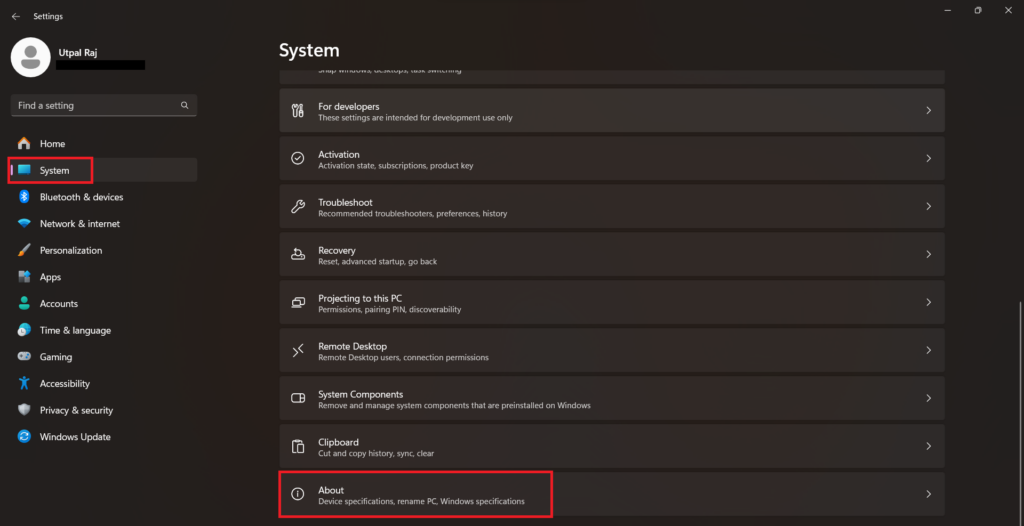
4. Here, you’ll get your device specification, click on the Advanced system settings option.
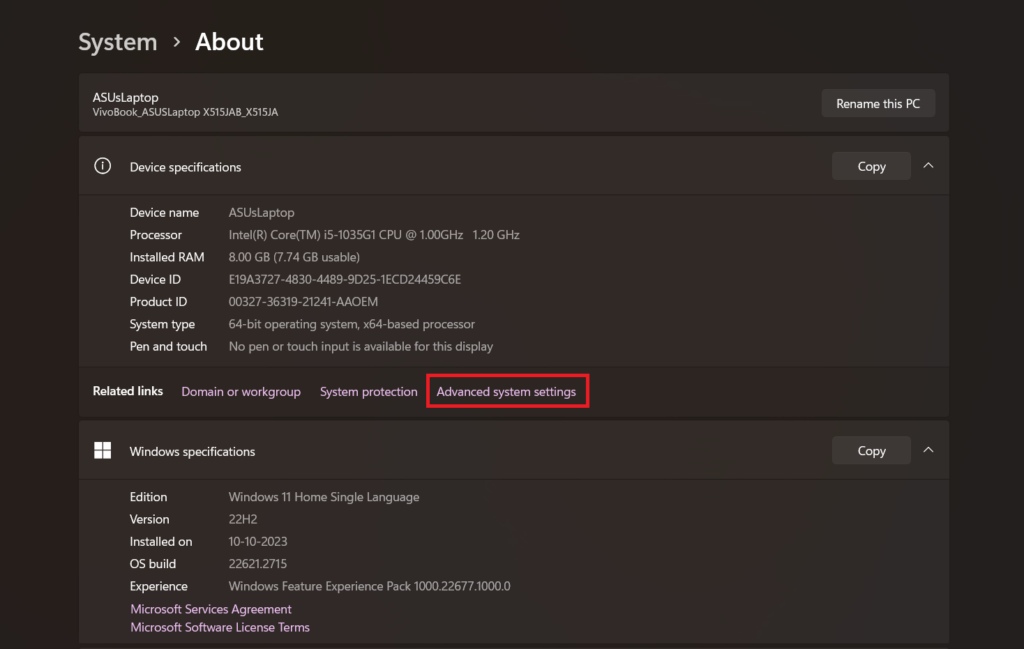
5. Now, you’ll be prompted with the System Properties window. Here, click on the Advanced tab and then click on Settings under Performance.
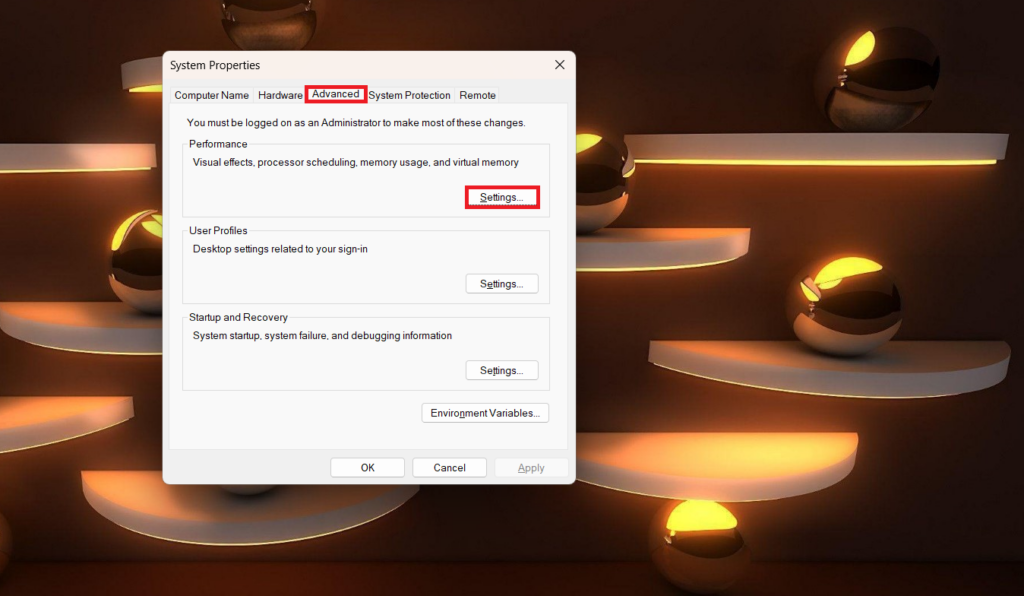
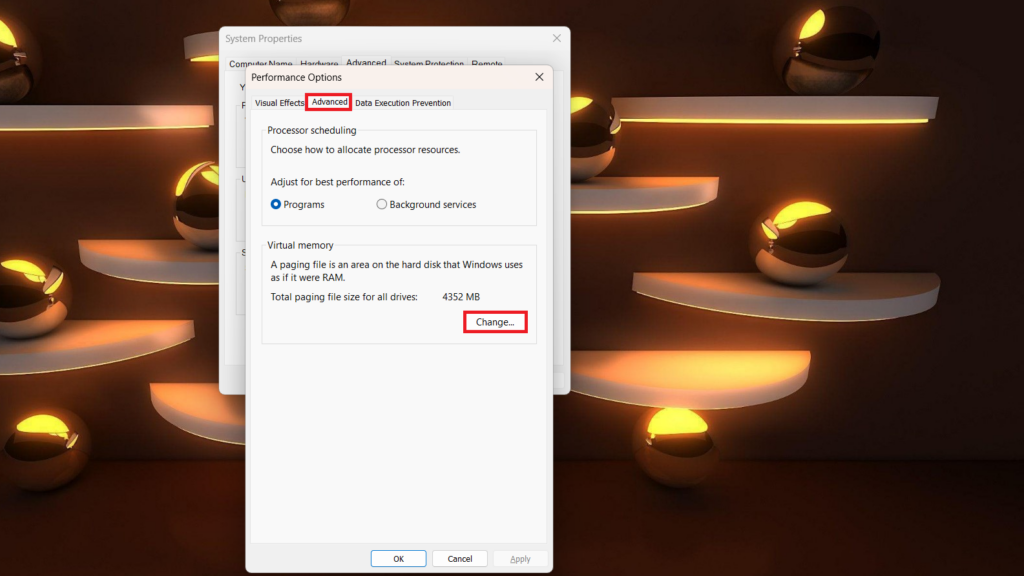
6. In the Performance Options window, select the Advanced tab.
7. Click on the Change button under the Virtual Memory section.
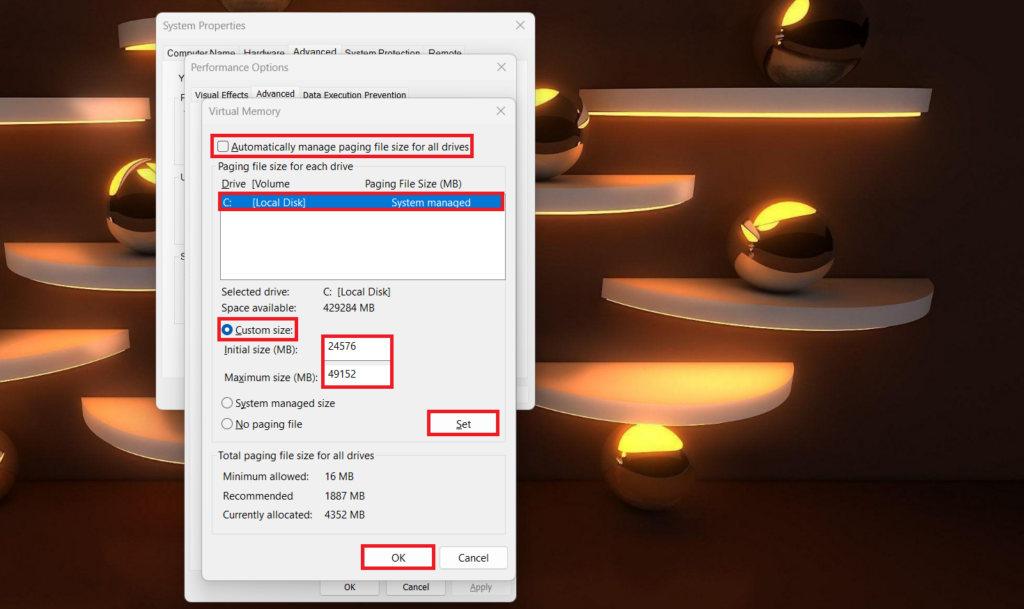
8. Here, uncheck the box that says – Automatically manage the paging file size for all drives and select the drive you want to use as virtual memory.
9. Choose the Custom size option under the Paging file size for each drive section.
10. Now, enter the initial and maximum size for the virtual memory in megabytes (MB).
Note
The recommended initial size is 1.5 times the amount of physical RAM on your system, and the recommended maximum size is 3 times the amount of physical RAM. However, you can adjust these values as needed.
11. Then, click the Set to apply the specified virtual memory.
12. Click the OK to close the Virtual Memory window.
13. After that, restart your computer for the changes to take effect.
Physical RAM is faster than virtual memory, and relying heavily on virtual memory can reduce system performance. If you frequently encounter the need to increase virtual memory, it will be worth considering upgrading your computer’s physical RAM for durable solution.
Conclusion
By following the above-mentioned steps, you can increase virtual memory in Windows 11. Using it, you can now temporarily boost your system’s performance. However, if you’re running low on storage or experiencing lag, increasing virtual memory shouldn’t be a permanent solution.
Instead, consider fixes for high RAM usage in Windows 11 to address the underlying issue. So, give it a try to improve your performance. However, if you encounter any difficulties or have some doubts, don’t hesitate to leave them in the comment section. We’re here to help.