VLC Media Player is a versatile and popular multimedia player that supports various audio and video formats. One of its standout features is hardware acceleration, which can significantly enhance your media playback experience. Enabling hardware acceleration allows VLC to offload some of the processing tasks to your computer’s GPU, resulting in smoother playback and reduced CPU usage.
In this guide, we’ll walk you through the steps to enable hardware acceleration in VLC Media Player. However, if VLC Media Player is not working or you are unable to play video and audio, then you can check out our guide on how to fix VLC Media Player not working in Windows 11.
What is Hardware Acceleration?
Hardware acceleration is a technology that leverages specialized hardware components, such as a graphics processing unit (GPU), to perform certain tasks more efficiently than a general-purpose CPU.
In the context of media playback, hardware acceleration can help decode and render videos with improved performance and reduced power consumption.
Why Enable Hardware Acceleration in VLC?
Enabling hardware acceleration in VLC Media Player can provide several benefits, including:
- Smoother Playback: Videos with high resolutions or demanding codecs can strain your CPU. Hardware acceleration offloads some of this work to the GPU, resulting in smoother playback even for resource-intensive files.
- Reduced CPU Usage: Hardware acceleration decreases the CPU load during media playback, allowing your computer to perform other tasks more efficiently.
- Energy Efficiency: By utilizing the GPU, hardware acceleration can reduce power consumption compared to relying solely on the CPU.
How to Enable Hardware Acceleration in VLC
Before you proceed, ensure you have the latest version of VLC Media Player installed on your computer. Software updates often include improvements and bug fixes, so it’s essential to have the most up-to-date version.
Now, let’s dive into the steps to enable hardware acceleration in VLC.
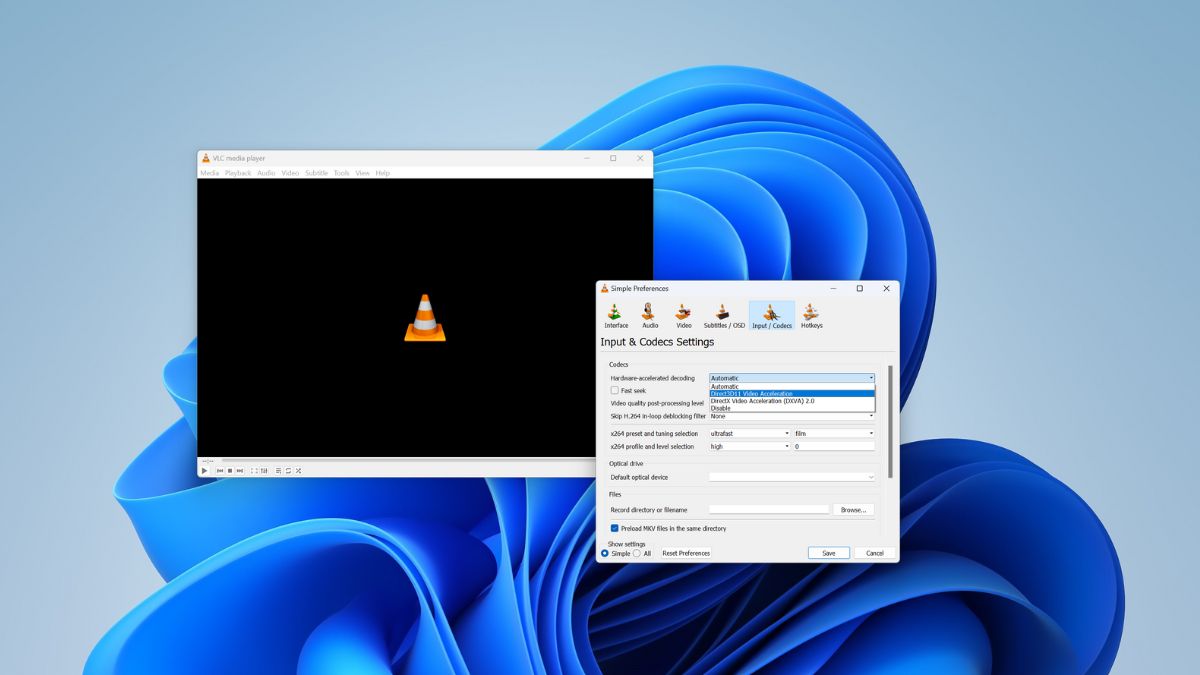
1. Open VLC Media Player.
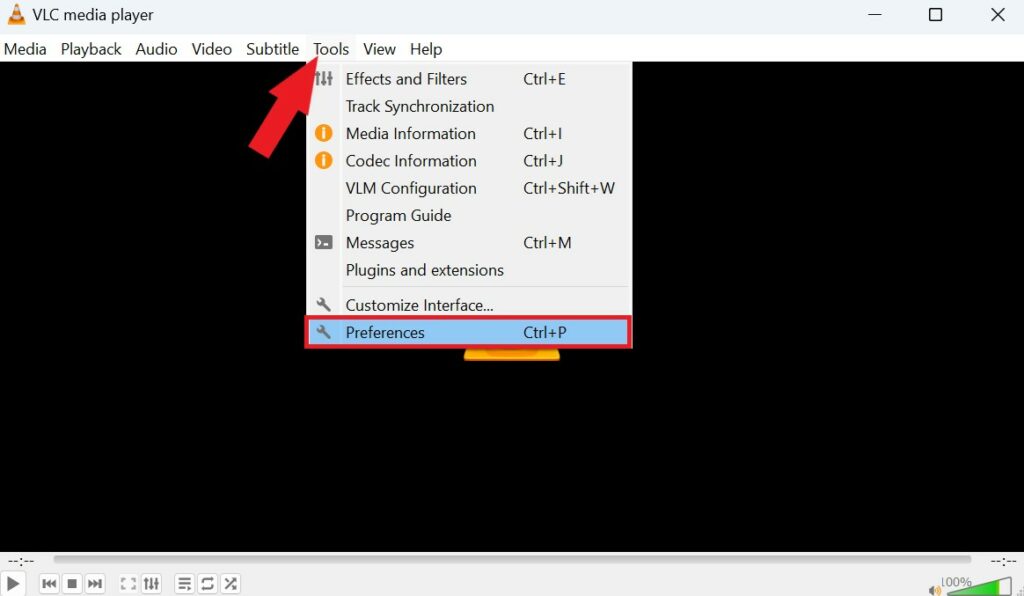
2. Click on the Tools option in the top menu bar, then select Preferences. Or, use the keyboard shortcut Ctrl + P to open the preferences window.
3. In the Preferences window, click on the Input/Codecs category.
4. In the Hardware-accelerated decoding section, you’ll find a dropdown menu next to Hardware-accelerated decoding. Click on it to reveal the available options.
5. Choose one of the hardware acceleration options based on your hardware:
- Automatic: Let VLC automatically detect and use hardware acceleration when available.
- DirectX Video Acceleration (DXVA 2.0): Select this option if you have a Windows PC with compatible hardware.
- Direct3D11 Video Acceleration: It utilizes Microsoft’s Direct3D11 graphics API to accelerate video decoding processes on compatible hardware.

6. Click the Save button at the bottom-right corner to apply the changes.
7. Finally, close the VLC Media Player and reopen it to use VLC with Hardware Acceleration.
Note
This feature may not work properly on all system hardware. If you experience issues after enabling Hardware Acceleration in VLC, you can disable it.
Conclusion
Enabling hardware acceleration in VLC Media Player is a simple yet effective way to enhance your media playback experience. By offloading some processing tasks to your GPU, you can enjoy smoother playback, reduced CPU usage, and increased energy efficiency. Try following the steps mentioned in this guide to improve your VLC experience and enjoy your favorite videos with ease.
Now that you’ve enabled hardware acceleration in VLC, test it with various types of media files. You should notice smoother playback and reduced CPU usage, especially when playing high-definition videos.